A dialog is a small window that prompts the user to make a decision or enter additional information. A dialog does not fill the screen and is normally used for modal events that require users to take an action before they can proceed.
Dialog is the way where user get notify by app in very clean manner.Dialog is useful for showing alert text, Simple information , show List ,and even you can get value from dialog also.
Android is provide default theme for dialog but if you want to create your own custom dialog then its very easy to build and it will improve your app's look.
So here i will show you a simple example to create custom dialog and same way you can create any type of dialog as you want.
We will create separate class name with
If you want to do some action in dialog which need an Activity and Context then its simple you have to create on Constructor and pass current activity and context as like
Yeah, if you want to pass some other params, then same way you have to add when you call your constructor.
So now we are going to build a custom dialog.We will start with XML User Interface .
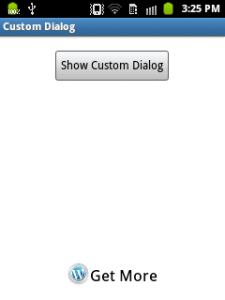
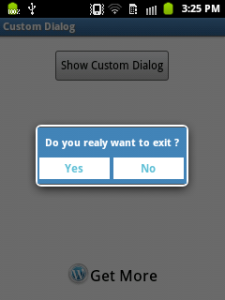
So how it looks ?


Here you can find same example. Check it out.
Hope you learn concept about concept about Custom Dialog and now you are able to crate your own custom dialog.
Dialog is the way where user get notify by app in very clean manner.Dialog is useful for showing alert text, Simple information , show List ,and even you can get value from dialog also.
Android is provide default theme for dialog but if you want to create your own custom dialog then its very easy to build and it will improve your app's look.
So here i will show you a simple example to create custom dialog and same way you can create any type of dialog as you want.
We will create separate class name with
CustomDialogClass which will extent Dialog class and implement android.view.View.OnClickListener.If you want to do some action in dialog which need an Activity and Context then its simple you have to create on Constructor and pass current activity and context as like
CustomDialogClass( Activity act , Context ctx).Yeah, if you want to pass some other params, then same way you have to add when you call your constructor.
So now we are going to build a custom dialog.We will start with XML User Interface .
01
02
03
04
05
06
07
08
09
10
11
12
13
14
15
16
17
18
19
20
21
22
23
24
25
26
27
28
29
30
31
32
33
34
35
36
37
38
39
40
41
42
43
44
45
46
47
48
49
50
51
52
53
54
55
56
57
58
59
60
61
62
63
| <LinearLayoutandroid:layout_width="fill_parent"android:layout_height="fill_parent"android:layout_weight="1"android:gravity="center"android:orientation="vertical" ><ImageViewandroid:id="@+id/user_photo"android:layout_width="fill_parent"android:layout_height="fill_parent"android:src="@drawable/user_logo" /></LinearLayout> <?xml version="1.0" encoding="utf-8"?><LinearLayout xmlns:android="http://schemas.android.com/apk/res/android" android:layout_width="fill_parent" android:layout_height="80dp" android:background="#3E80B4" android:orientation="vertical" > <TextView android:id="@+id/txt_dia" android:layout_width="wrap_content" android:layout_height="wrap_content" android:layout_gravity="center" android:layout_margin="10dp" android:text="Do you realy want to exit ?" android:textColor="@android:color/white" android:textSize="15dp" android:textStyle="bold" > </TextView> <LinearLayout android:layout_width="wrap_content" android:layout_height="wrap_content" android:layout_gravity="center" android:background="#3E80B4" android:orientation="horizontal" > <Button android:id="@+id/btn_yes" android:layout_width="100dp" android:layout_height="30dp" android:background="@android:color/white" android:clickable="true" android:text="Yes" android:textColor="#5DBCD2" android:textStyle="bold" /> <Button android:id="@+id/btn_no" android:layout_width="100dp" android:layout_height="30dp" android:layout_marginLeft="5dp" android:background="@android:color/white" android:clickable="true" android:text="No" android:textColor="#5DBCD2" android:textStyle="bold" /> </LinearLayout></LinearLayout> |
<LinearLayout
android:layout_width="fill_parent"
android:layout_height="fill_parent"
android:layout_weight="1"
android:gravity="center"
android:orientation="vertical" >

<ImageView
android:id="@+id/user_photo"
android:layout_width="fill_parent"
android:layout_height="fill_parent"
android:src="@drawable/user_logo" />
</LinearLayout>

<?xml version="1.0" encoding="utf-8"?>
<LinearLayout xmlns:android="http://schemas.android.com/apk/res/android"
    android:layout_width="fill_parent"
    android:layout_height="80dp"
    android:background="#3E80B4"
    android:orientation="vertical" >

    <TextView
        android:id="@+id/txt_dia"
        android:layout_width="wrap_content"
        android:layout_height="wrap_content"
        android:layout_gravity="center"
        android:layout_margin="10dp"
        android:text="Do you realy want to exit ?"
        android:textColor="@android:color/white"
        android:textSize="15dp"
        android:textStyle="bold" >
    </TextView>

    <LinearLayout
        android:layout_width="wrap_content"
        android:layout_height="wrap_content"
        android:layout_gravity="center"
        android:background="#3E80B4"
        android:orientation="horizontal" >

        <Button
            android:id="@+id/btn_yes"
            android:layout_width="100dp"
            android:layout_height="30dp"
            android:background="@android:color/white"
            android:clickable="true"
            android:text="Yes"
            android:textColor="#5DBCD2"
            android:textStyle="bold" />

        <Button
            android:id="@+id/btn_no"
            android:layout_width="100dp"
            android:layout_height="30dp"
            android:layout_marginLeft="5dp"
            android:background="@android:color/white"
            android:clickable="true"
            android:text="No"
            android:textColor="#5DBCD2"
            android:textStyle="bold" />
    </LinearLayout>

</LinearLayout>
CustomDialogClass.java
01
02
03
04
05
06
07
08
09
10
11
12
13
14
15
16
17
18
19
20
21
22
23
24
25
26
27
28
29
30
31
32
33
34
35
36
37
38
39
40
| public class CustomDialogClass extends Dialog implementsandroid.view.View.OnClickListener { public Activity c; public Dialog d; public Button yes, no; public CustomDialogClass(Activity a) { super(a); // TODO Auto-generated constructor stub this.c = a; } @Override protected void onCreate(Bundle savedInstanceState) { super.onCreate(savedInstanceState); requestWindowFeature(Window.FEATURE_NO_TITLE); setContentView(R.layout.custom_dialog); yes = (Button) findViewById(R.id.btn_yes); no = (Button) findViewById(R.id.btn_no); yes.setOnClickListener(this); no.setOnClickListener(this); } @Override public void onClick(View v) { switch (v.getId()) { case R.id.btn_yes: c.finish(); break; case R.id.btn_no: dismiss(); break; default: break; } dismiss(); }} |
public class CustomDialogClass extends Dialog implements
android.view.View.OnClickListener {

    public Activity c;
    public Dialog d;
    public Button yes, no;

    public CustomDialogClass(Activity a) {
        super(a);
        // TODO Auto-generated constructor stub
        this.c = a;
    }

    @Override
    protected void onCreate(Bundle savedInstanceState) {
        super.onCreate(savedInstanceState);
        requestWindowFeature(Window.FEATURE_NO_TITLE);
        setContentView(R.layout.custom_dialog);
        yes = (Button) findViewById(R.id.btn_yes);
        no = (Button) findViewById(R.id.btn_no);
        yes.setOnClickListener(this);
        no.setOnClickListener(this);

    }

    @Override
    public void onClick(View v) {
        switch (v.getId()) {
            case R.id.btn_yes:
                c.finish();
                break;
            case R.id.btn_no:
                dismiss();
                break;
            default:
                break;
        }
        dismiss();
    }
}
Now How to call it, in Activity or any ware in the app area ?
1
2
3
4
| public void Show_Dialog(View v) { CustomDialogClass cdd = new CustomDialogClass(MainActivity.this); cdd.show();} |
1
| new DownloadFilesTask().execute(url1, url2, url3); |
new DownloadFilesTask().execute(url1, url2, url3);Call above method in button's click event like
android:onClick="Show_Dialog"So how it looks ?


Here you can find same example. Check it out.
Hope you learn concept about concept about Custom Dialog and now you are able to crate your own custom dialog.

 How its' works ?[/caption]